Mastering Version Control with Builderius: A Comprehensive Guide
Article
Post contribution by: Angelika Reisiger
In this deep dive, we explore the powerful version control system built into Builderius, designed to streamline your WordPress development process. From tracking changes to managing branches, this guide will equip you with the knowledge to effectively utilize Builderius for your projects.
Table of Contents
- Introduction to Version Control
- Understanding Git and Its Role
- Visualizing the Development Process
- Branches in Builderius
- Creating and Managing Releases
- Starting Your First Project: The Coming Soon Page
- Building the Blog Index Template
- Creating a Post Template
- Managing Releases and Templates
- Exporting and Importing Releases
- Future Enhancements and Pro Version Features
- Conclusion
- FAQ
Introduction to Version Control
Version control is an essential part of modern software development. It allows developers to track changes, collaborate effectively, and manage the evolution of a project over time. In Builderius, version control is seamlessly integrated, enabling you to maintain a clear history of your development process.
This system not only preserves the integrity of your code but also gives you the flexibility to experiment with new ideas without the fear of breaking existing features. Imagine being able to revert to a previous state of your project at any moment—this is the power of version control.
What is Version Control?
At its core, version control is a set of tools and practices designed to manage changes to code and other digital assets. It enables you to:
- Track revisions and changes to your codebase.
- Collaborate with other developers without conflicts.
- Experiment with new features safely.
- Revert back to previous versions when necessary.
The Importance of Version Control
Moreover, having a detailed history of changes allows for greater accountability and understanding of how a project has evolved. This can be invaluable for debugging and understanding the rationale behind specific decisions made during development.
Understanding Git and Its Role
Git is one of the most popular version control systems available today. It provides a robust framework for tracking changes and managing versions of your code. Unlike some other systems, Git is designed to handle everything from small to very large projects with speed and efficiency.
Builderius version control is much like Git. It tracks every change made to your project, allowing you to manage your development process with ease.
The Basics of Git
Git operates primarily through a command line interface, but there are numerous graphical clients that provide a visual representation of your project’s history. This flexibility allows users to choose the method that best suits their workflow.
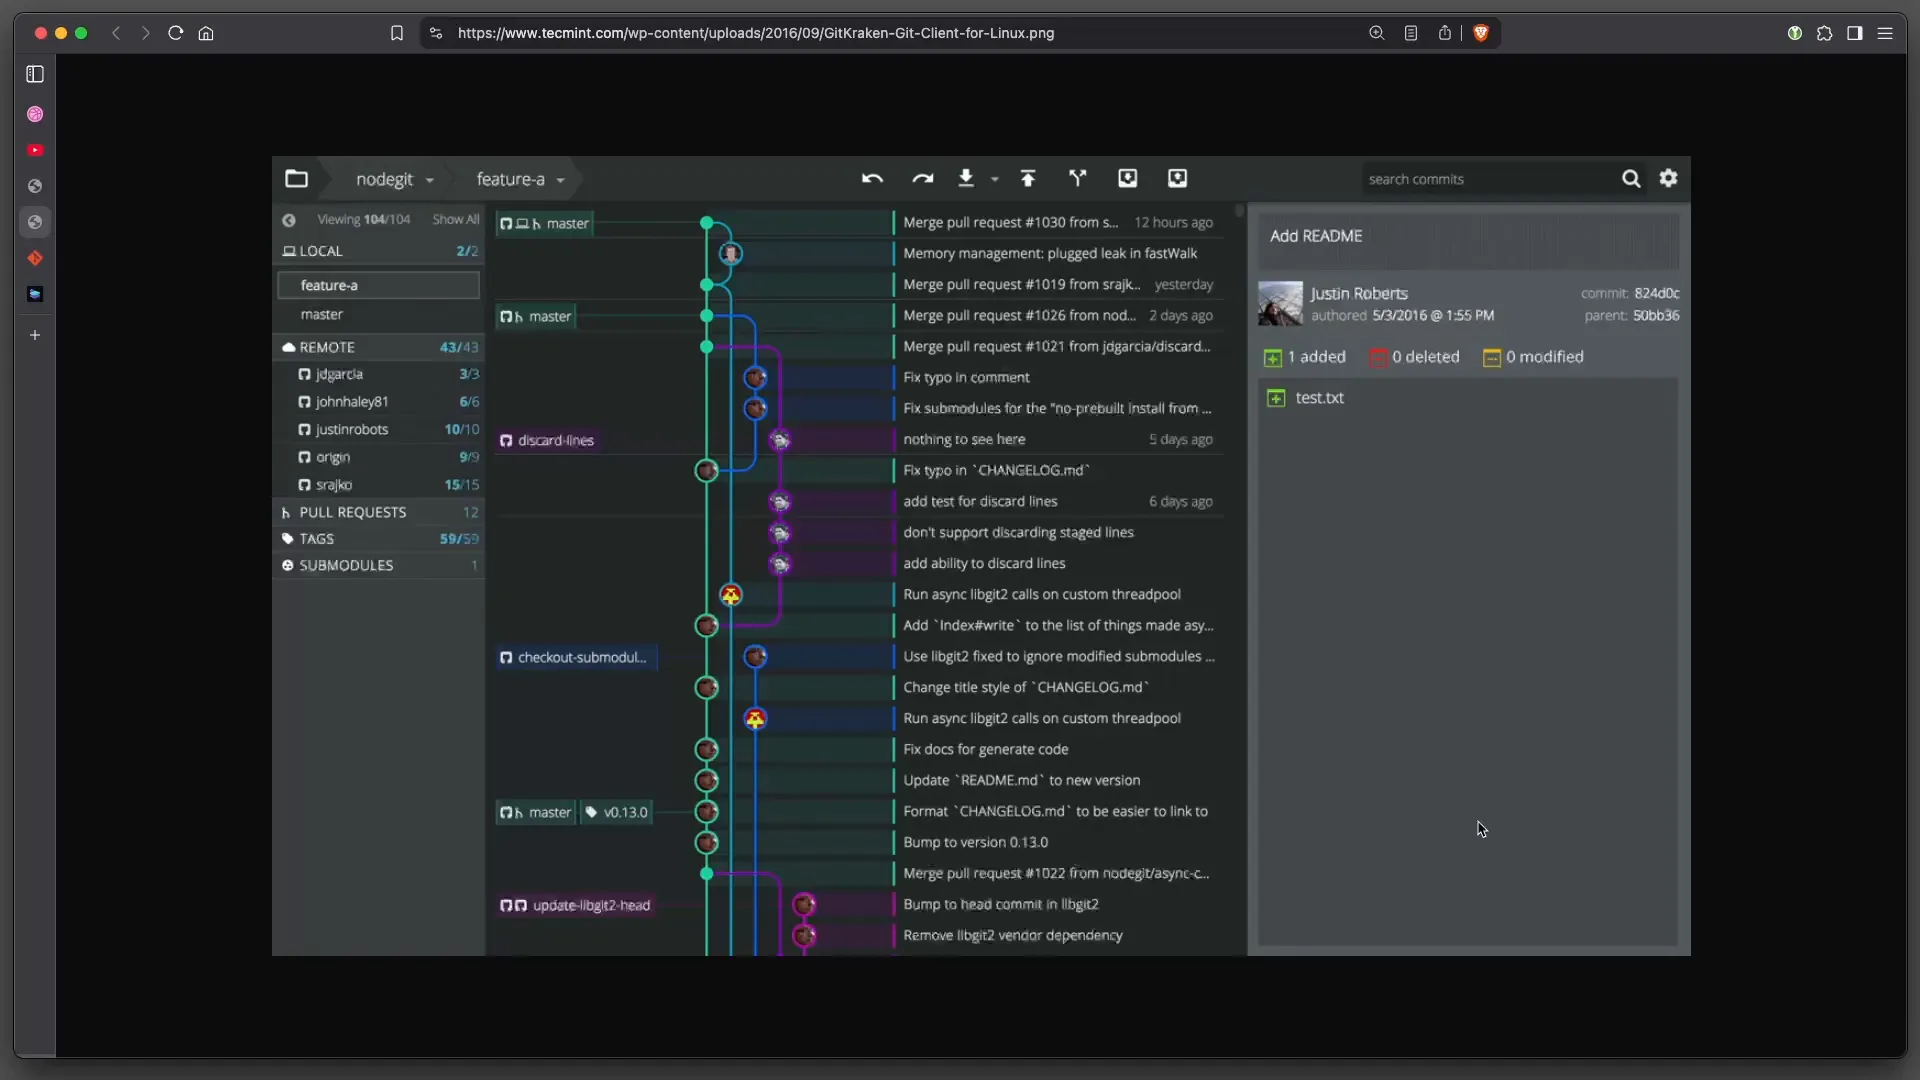
Key concepts in Git include:
- Commits: Each commit represents a snapshot of your project at a specific point in time.
- Branches: Branches allow you to work on different features or fixes in isolation from the main.
- Releases: A complete solution of some kind, ready for distribution, testing or use.
Branches in Builderius
Branches are a fundamental aspect of Git that enable you to create separate lines of development. In Builderius, we simplify this concept into two primary branches: the main (or production) branch and the development branch.
Each branch serves a distinct purpose:
- Production Branch: This is the live version of your project that is published for all visitors.
- Development Branch: This is where all features and changes are developed before publishing.
In Builderius, we utilize a simplified branching model. Each branch is dedicated to specific features or updates. Once a feature is completed, it is merged back into the main branch, ensuring that the production version remains stable.
Creating and Managing Releases
Managing releases is a crucial aspect of the development workflow in Builderius. A release encapsulates a set of changes that are ready to be deployed to the production environment. This process ensures that only stable and tested features go live.
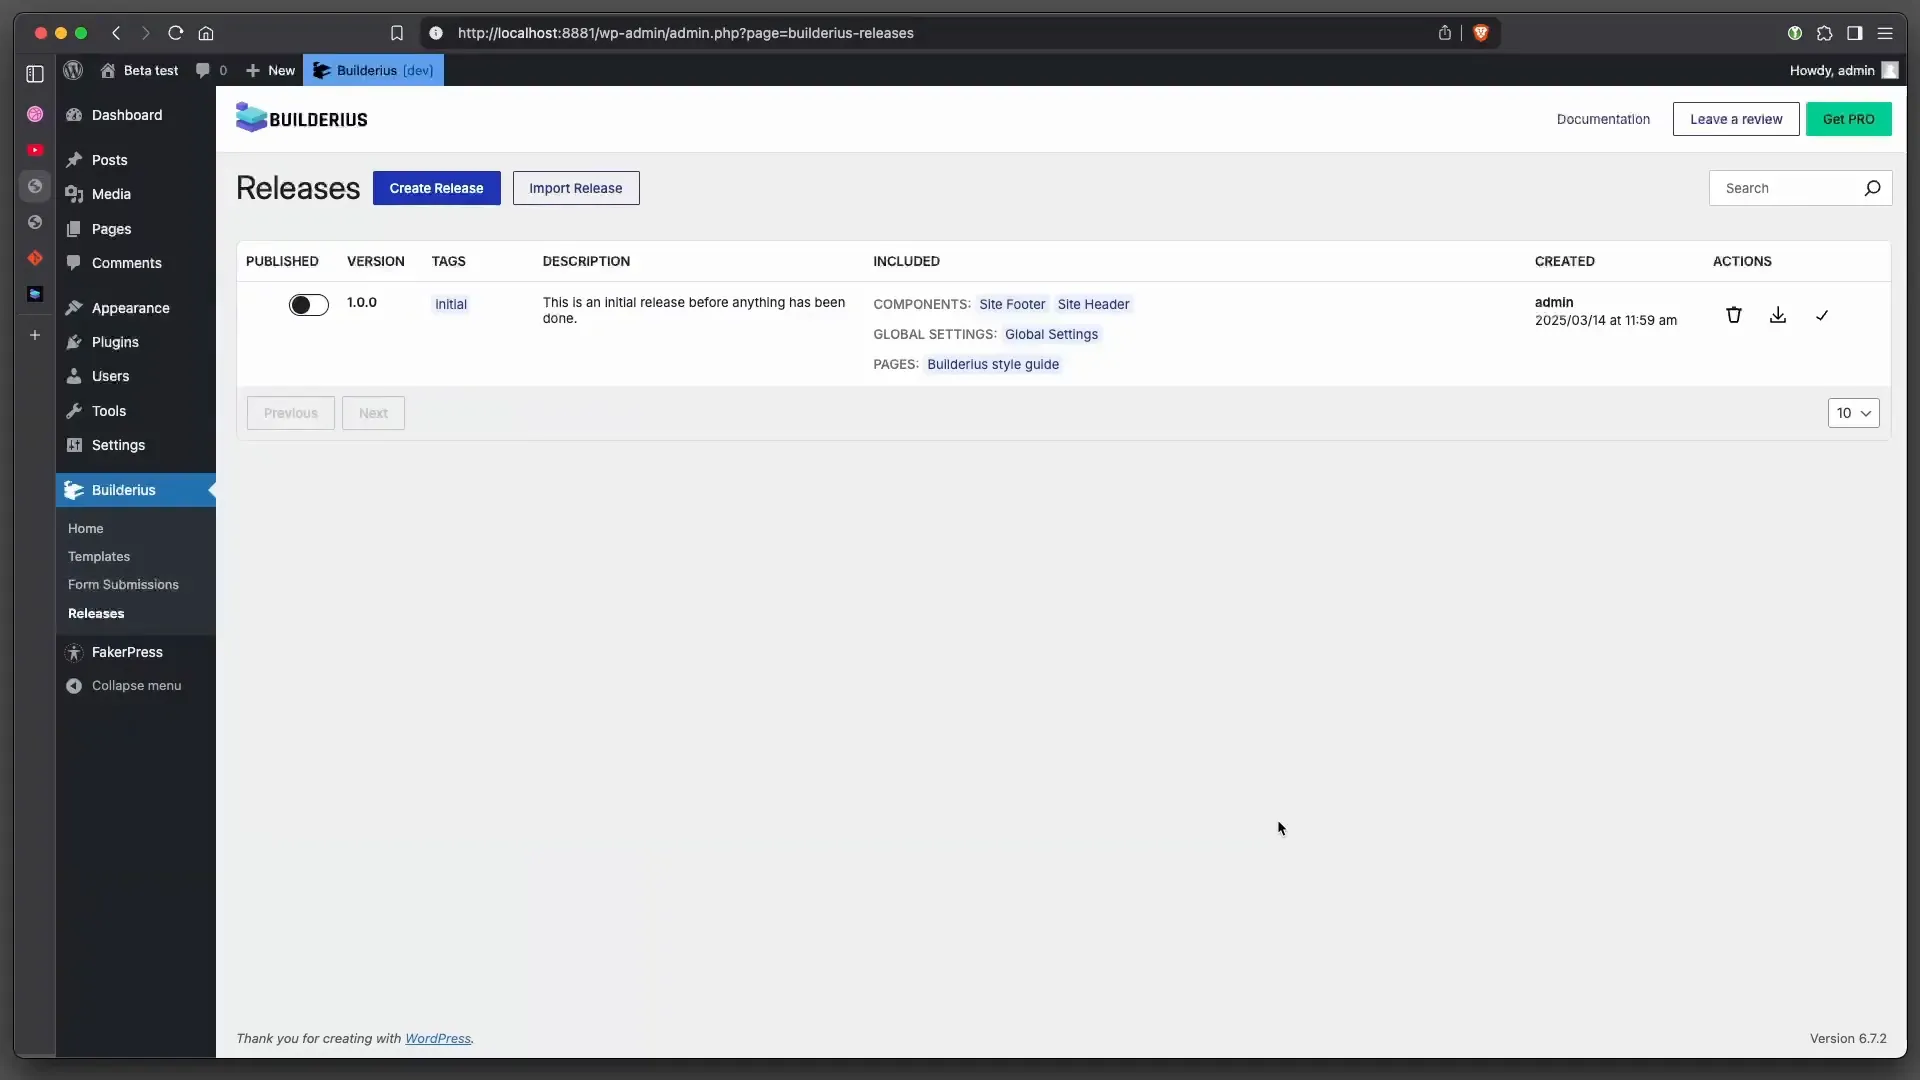
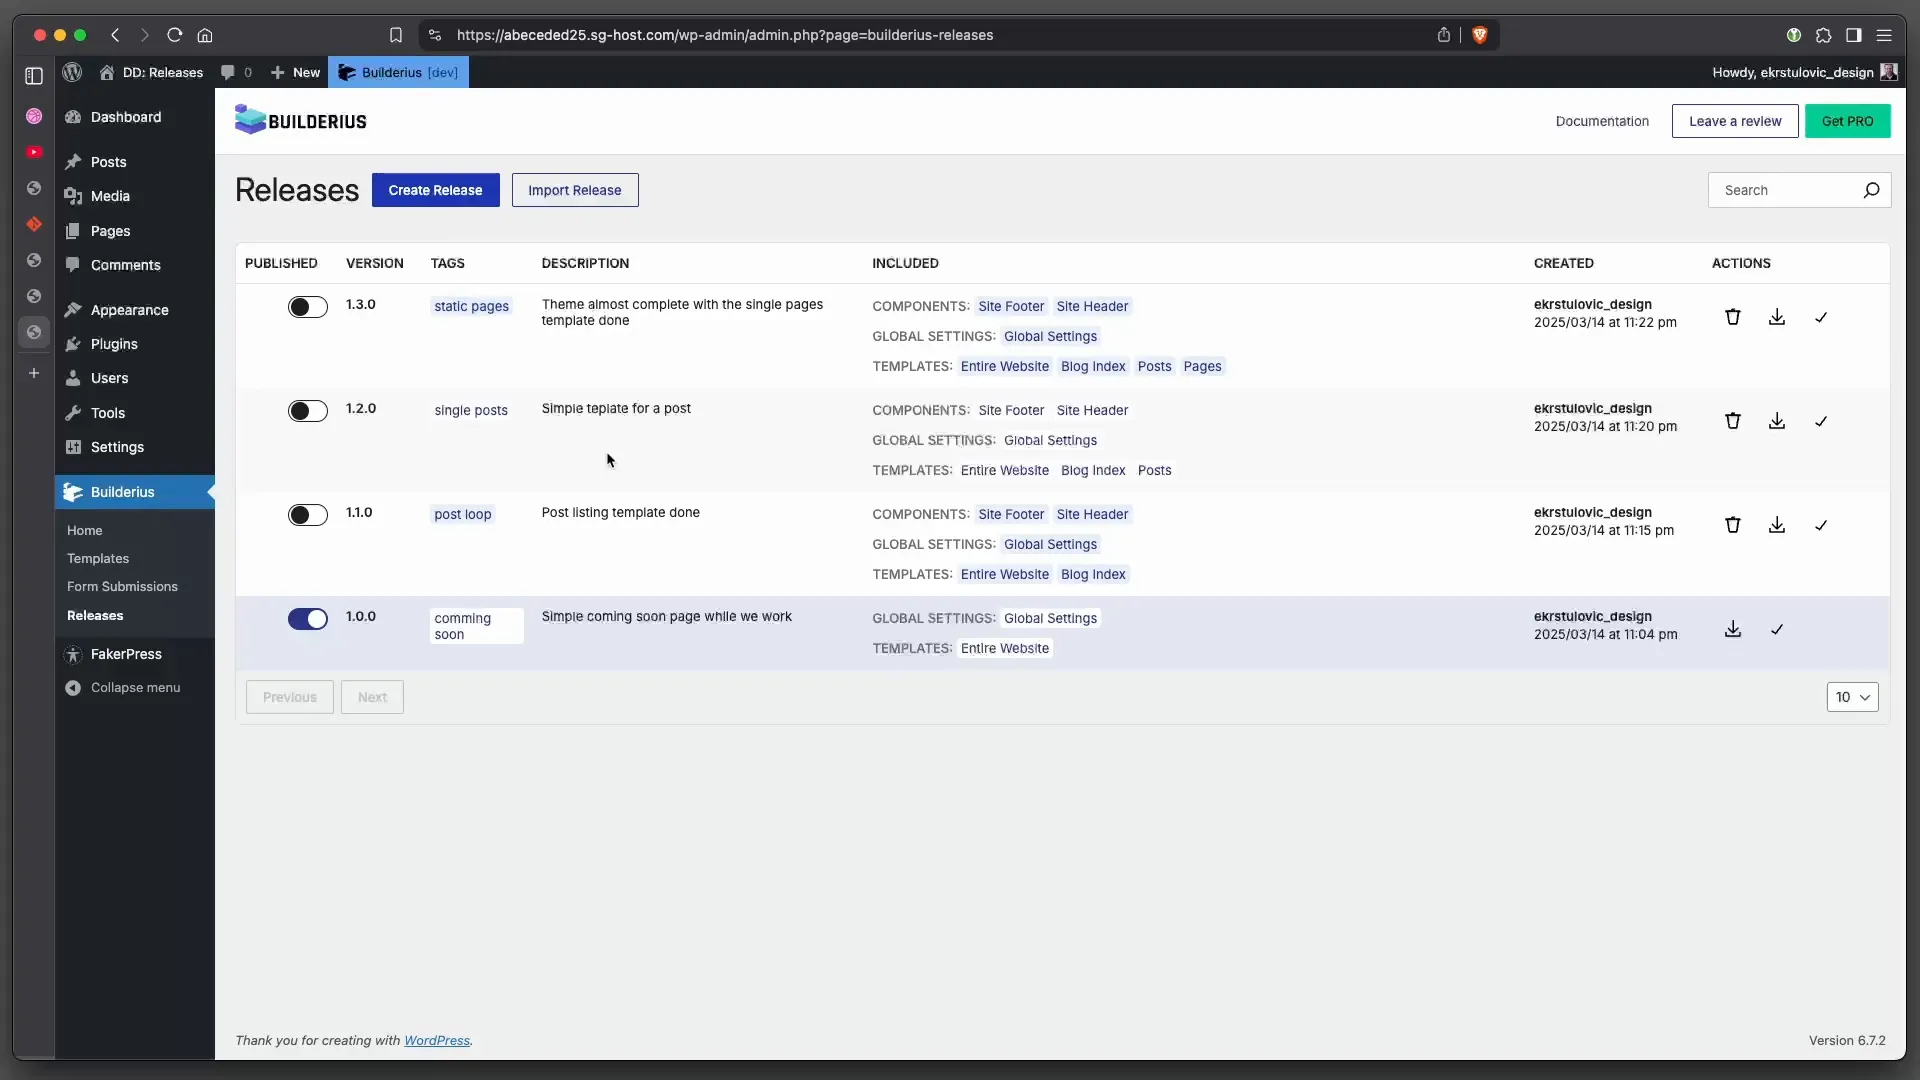
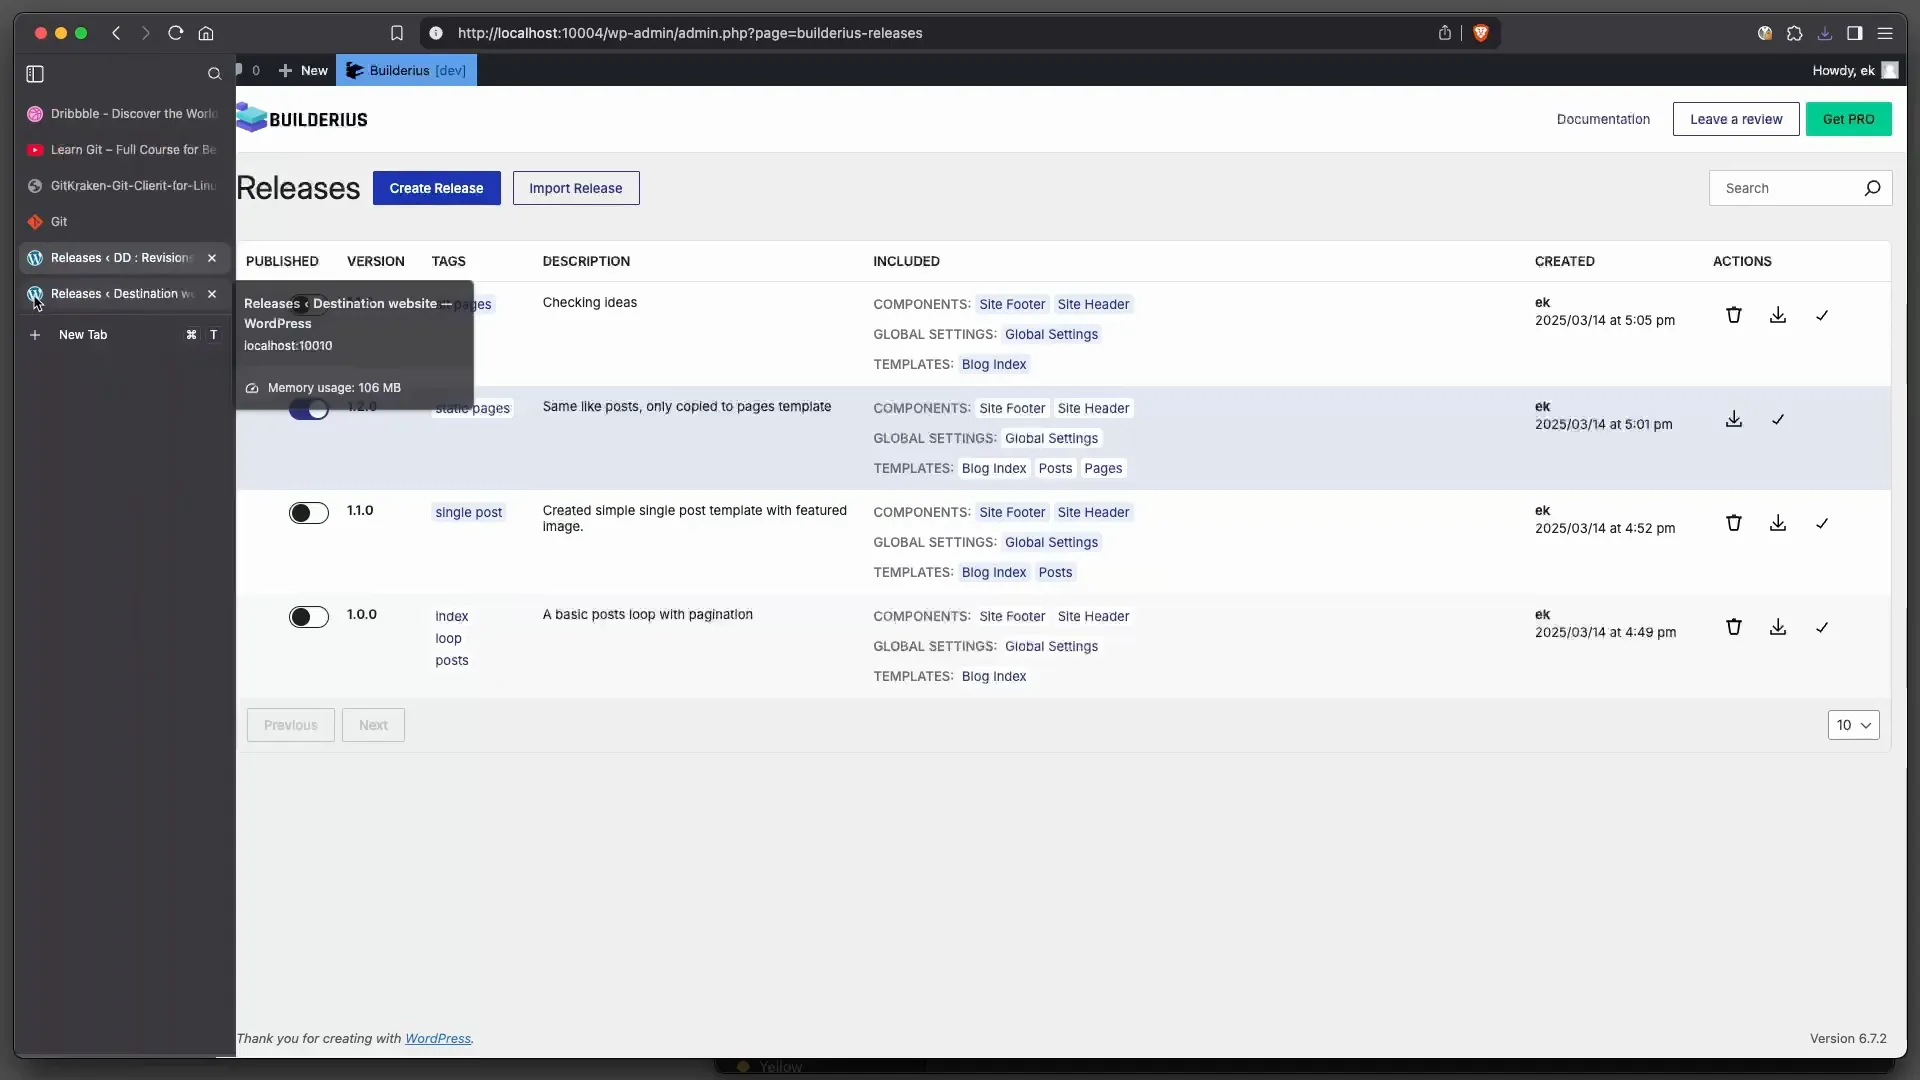
When you create a release in Builderius, you can specify the version number, add tags, and provide a description of the changes included. This documentation becomes invaluable for future reference and for team members who may join the project later. Each release provides these items that help describe it and work with it:
- The version number
- Tags for easy identification
- A description of what was included in the release
- Information about who created it and when
- Basic actions you mat want to perform: delete, export and extract its contents for future development
Steps to Create a Release
Creating a release in Builderius involves a few simple steps:
- Navigate to the releases section in the interface.
- Select the option to create a new release.
- Fill in the details, including version number and description.
- Choose whether to publish the release immediately or keep it in the development branch.
By following these steps, you can effectively manage your project’s releases and maintain a clear record of what has been deployed.
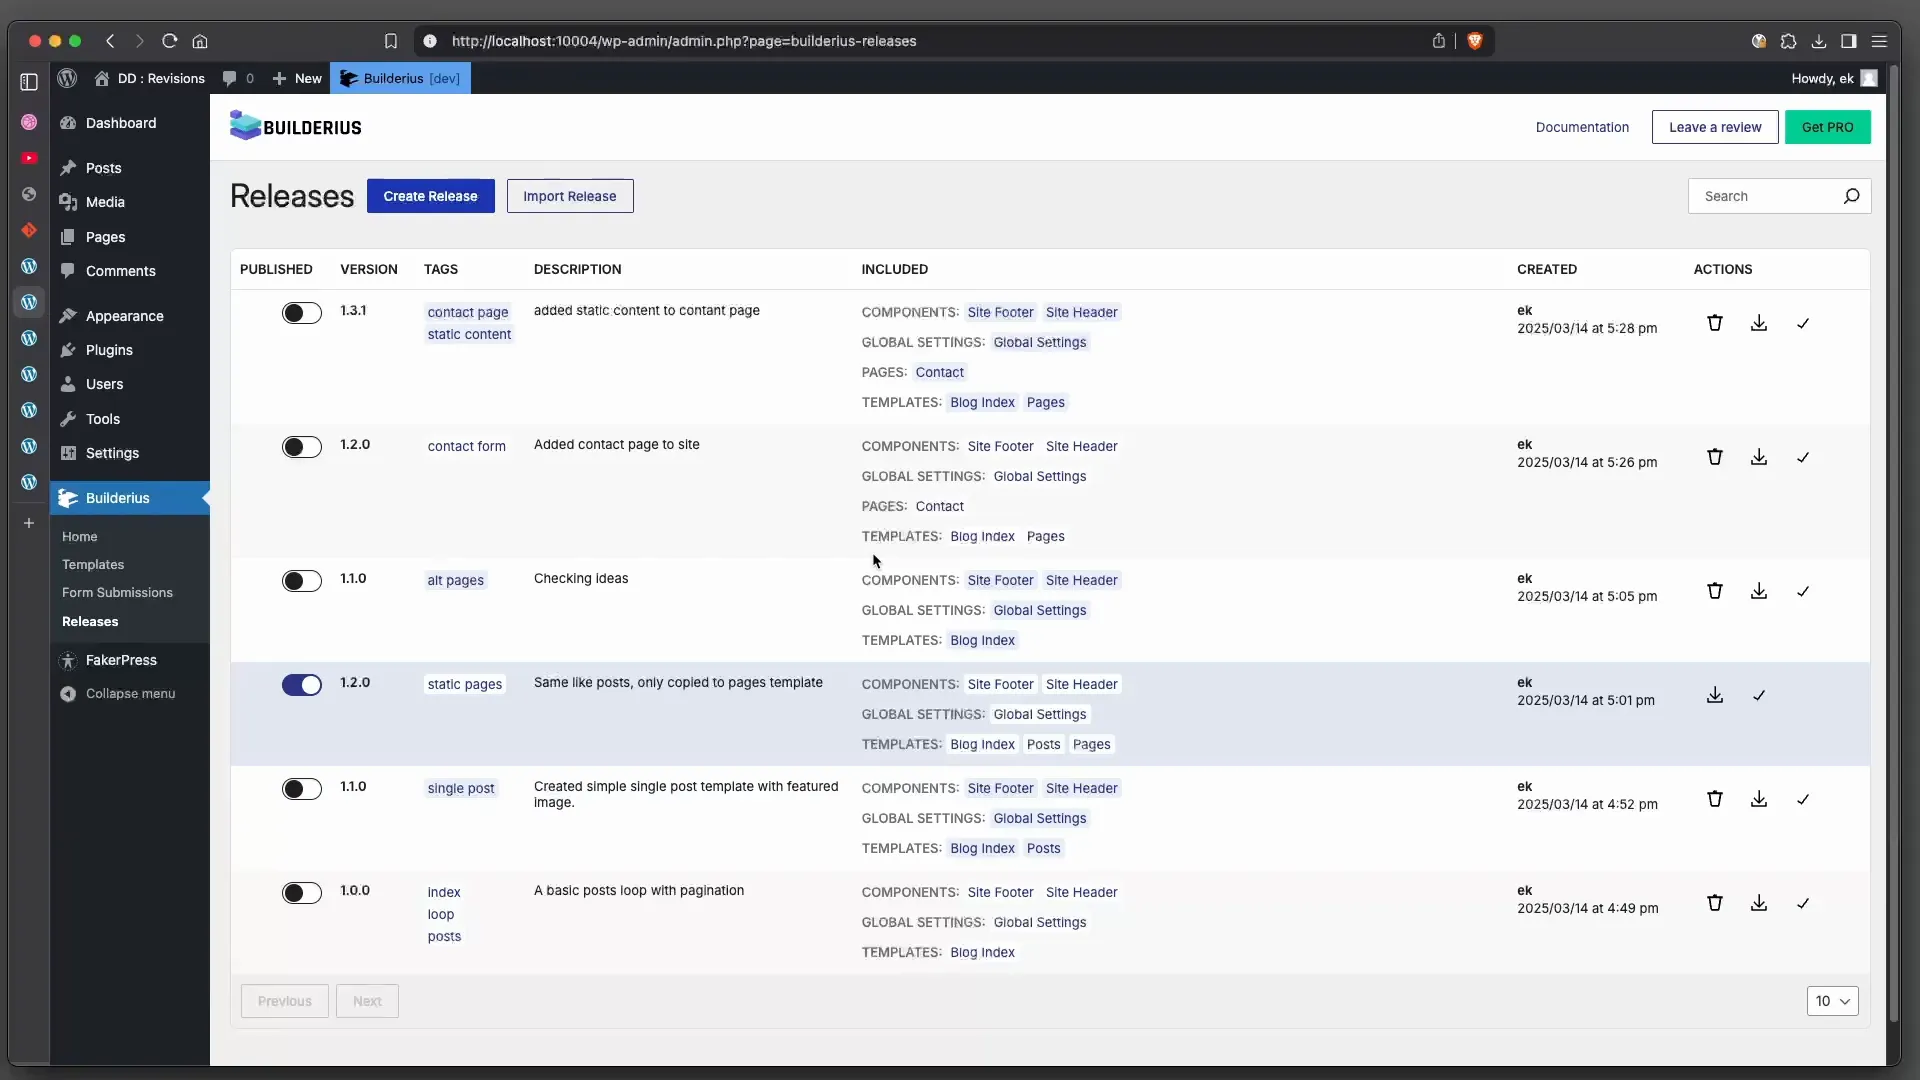
Tracking Progress with Releases
Releases not only serve as a way to deploy features but also act as checkpoints in your development process. Each release provides a snapshot of your project at a specific moment, allowing you to track changes over time.
In Builderius, you can view the history of your releases, see what has been deployed, and even revert to previous versions if needed. This level of control is essential for maintaining the quality of your project as it evolves.
Starting Your First Project: The Coming Soon Page
Creating a coming soon page is a great way to kickstart your project while you develop the full site behind the scenes. This page serves as a placeholder, letting visitors know that something exciting is on the way. Let’s dive into how to set it up in Builderius.
Creating the Template

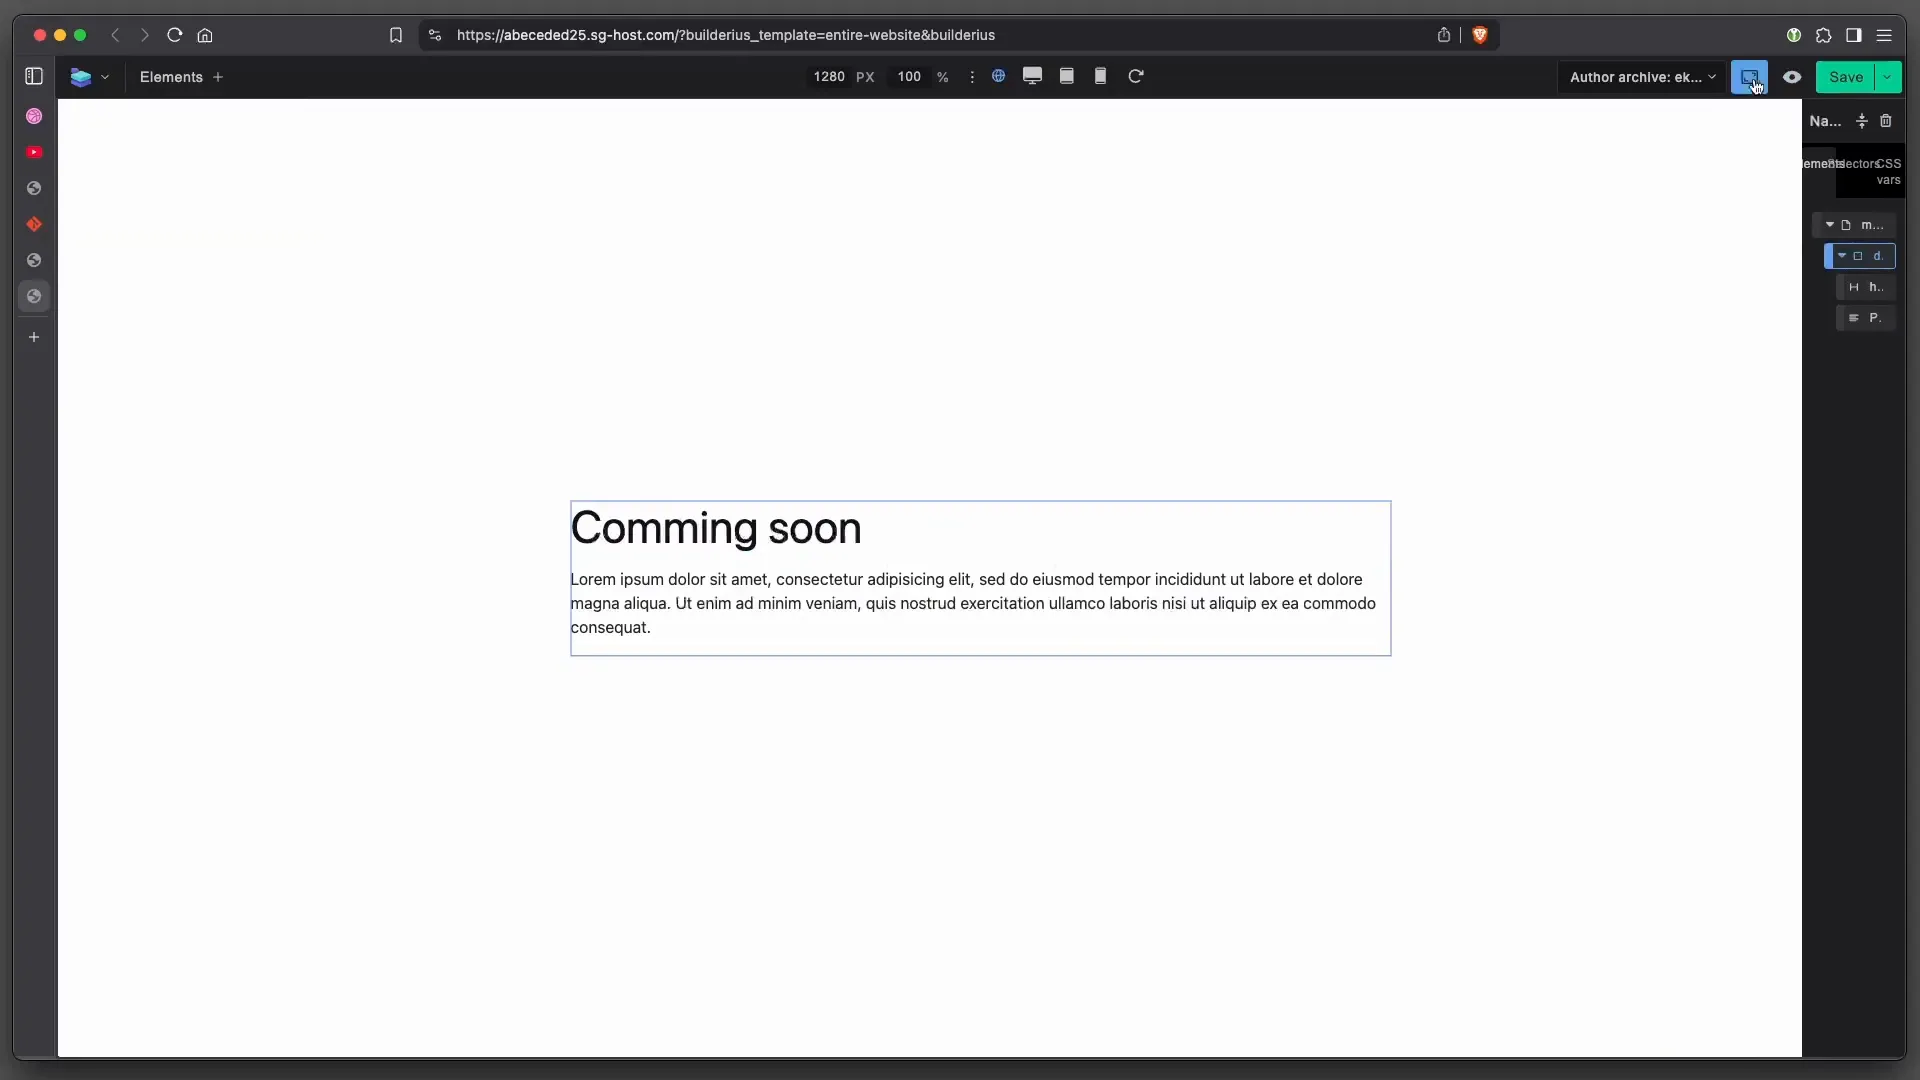
First, we need to create a template specifically for our coming soon page. In Builderius, navigate to the templates section and choose to create a new template and assign it to “Entire Website”. Since this is a simple layout, we won’t require a header or footer, so lets remove those.
Now, let’s add some content and style it any way you want. We are using a simple and minimal example here but you can be as simple or as complex as you want.
Once you’ve added your content, save and preview the page to ensure everything looks perfect.
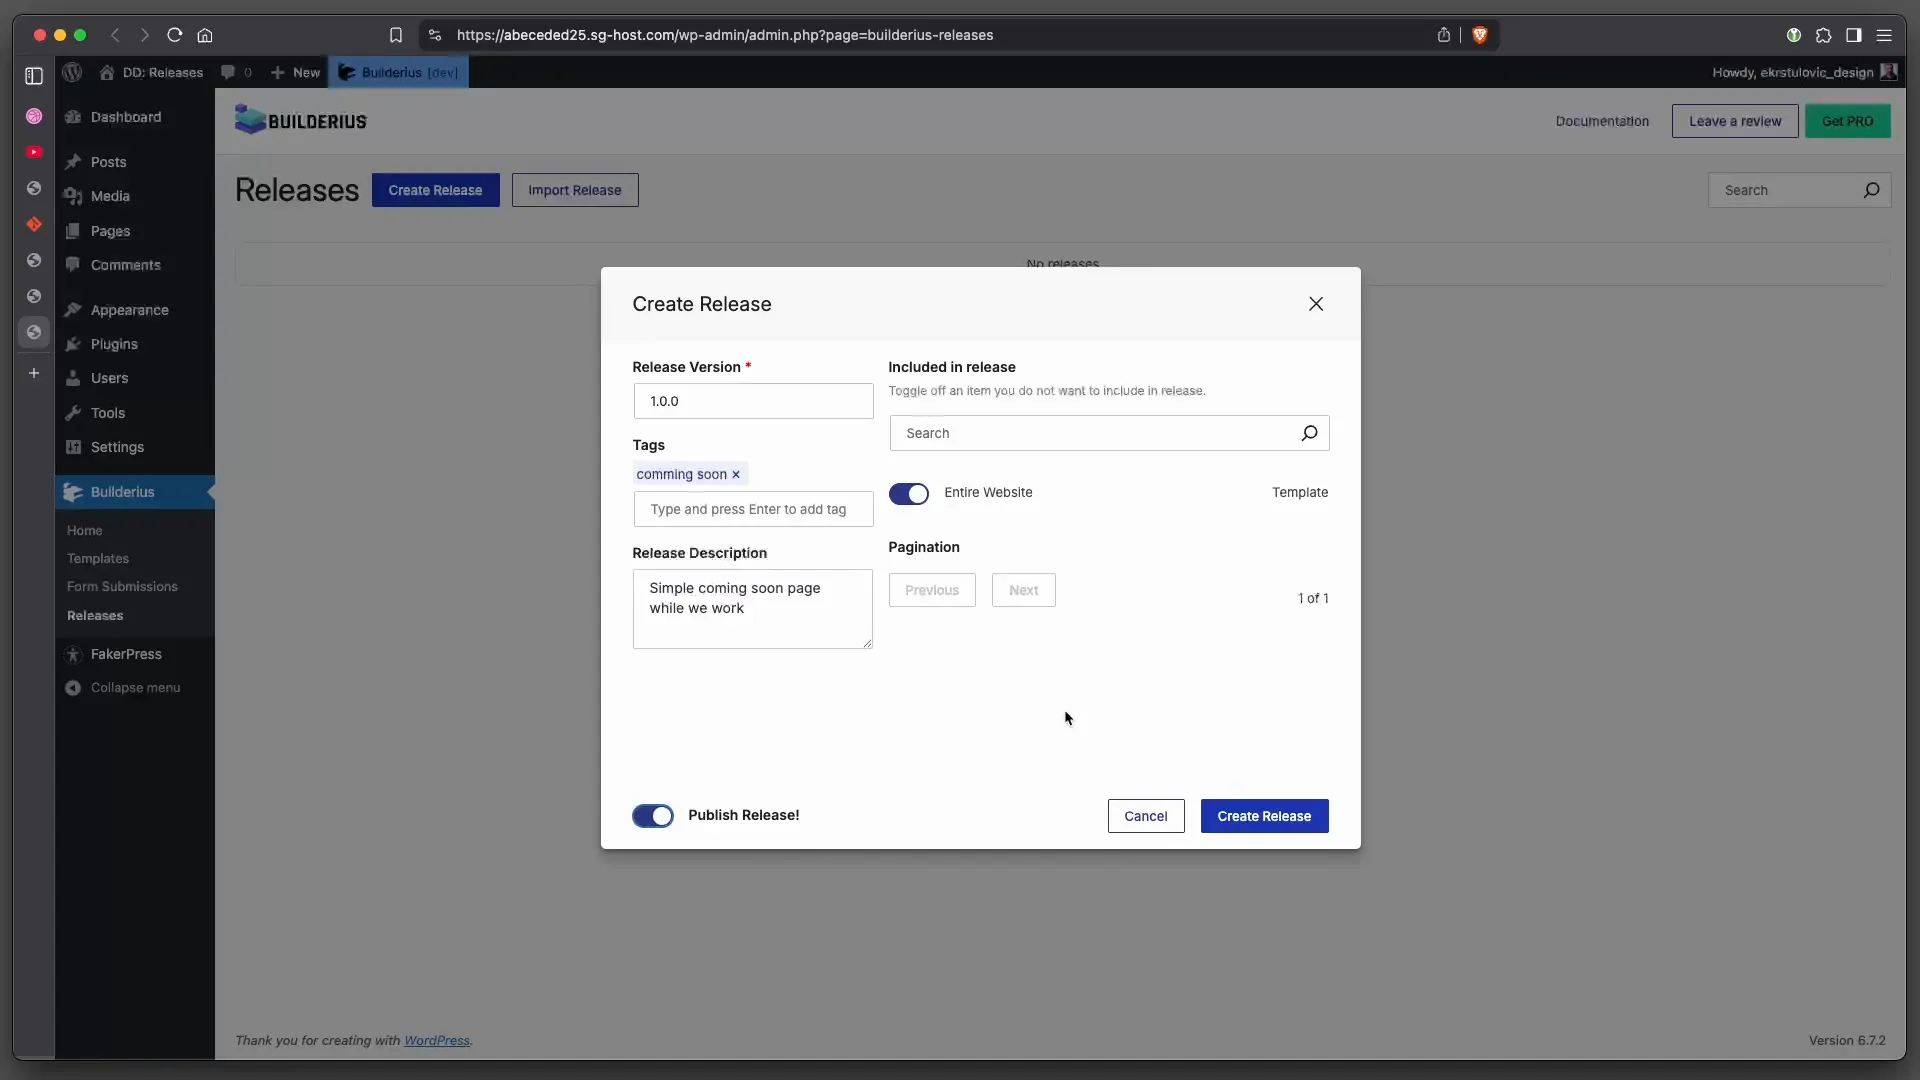
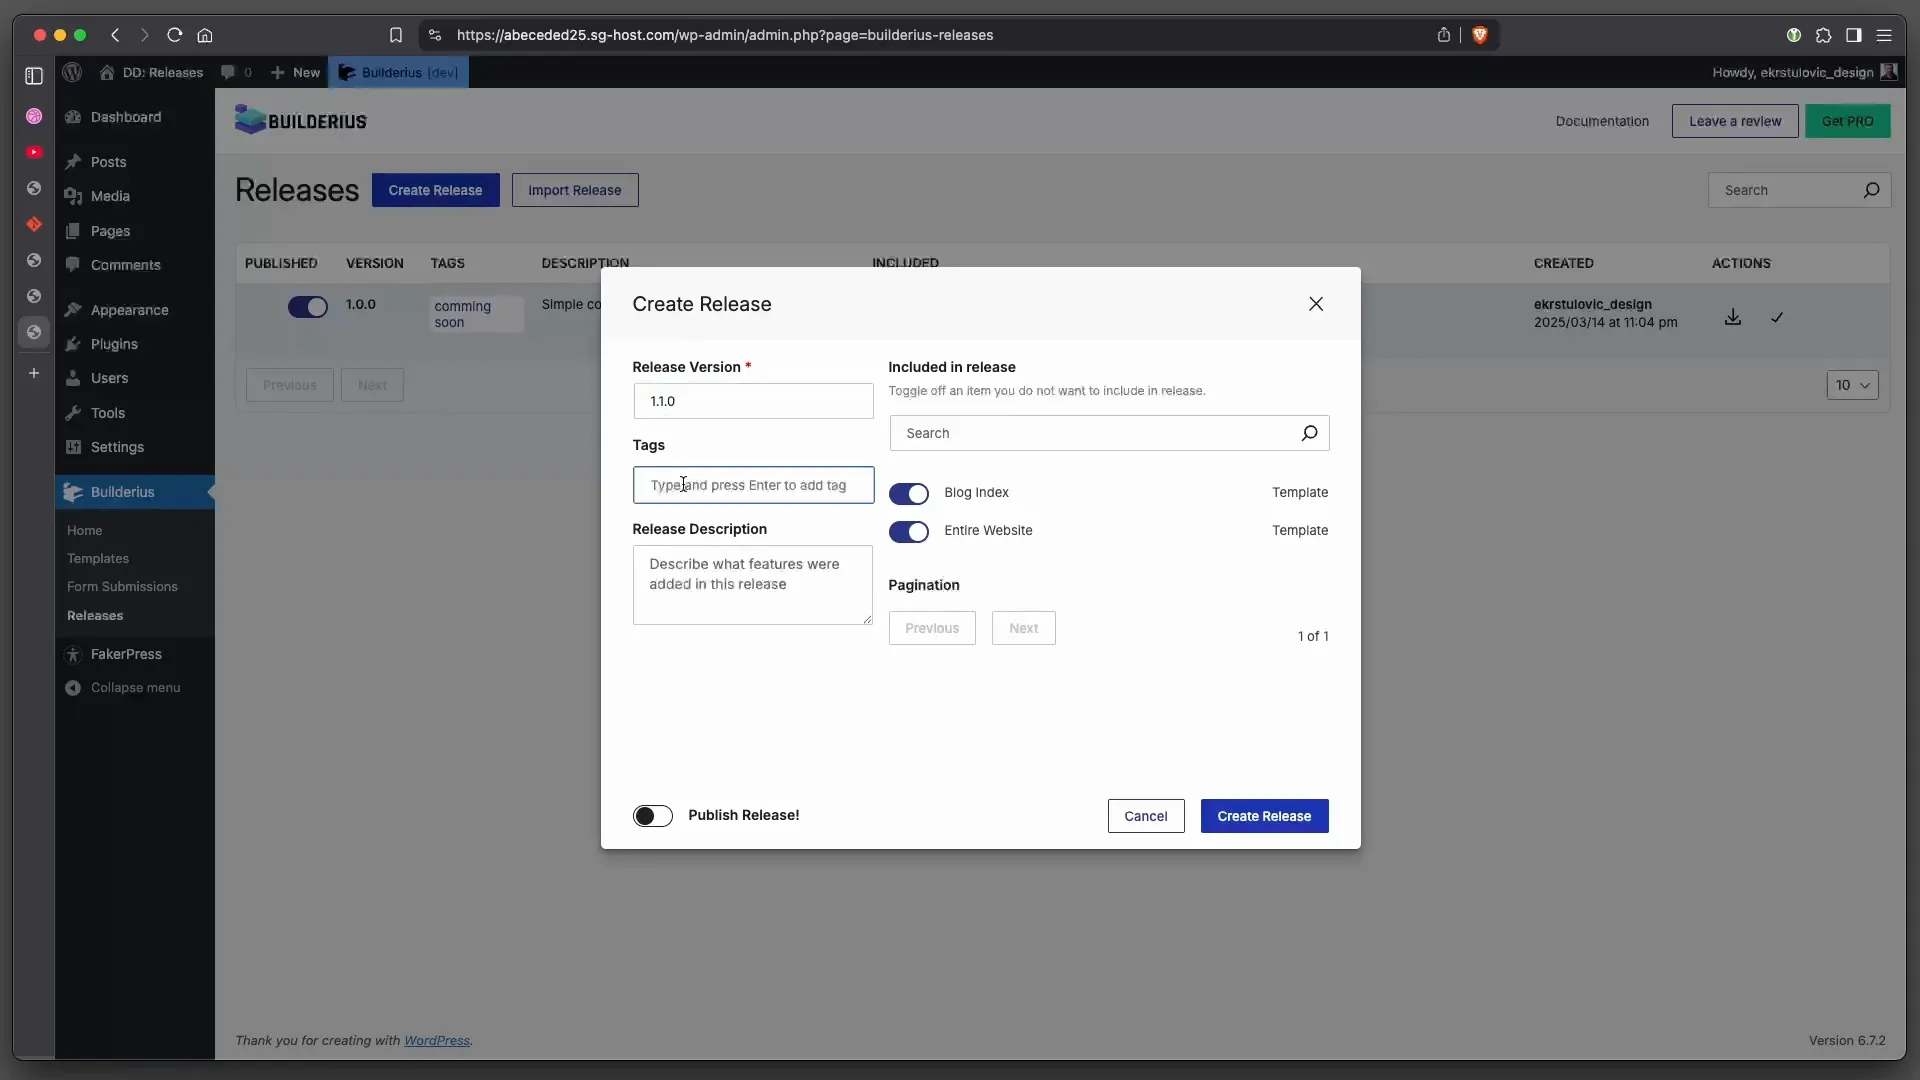
Creating the Release
With the template complete, it’s time to create your first release. This initial release will be version 1.0, and we’ll tag it as “coming.” In the description, note that it’s a simple coming soon page while the full site is in development.
Make sure to publish this release immediately into the production branch. This is an exception; typically, you would work in the development branch before going live.
Building the Blog Index Template
Next up is creating the blog index template. This template will display all your posts in a visually appealing format, making it easy for visitors to navigate your content.
Setting Up the Blog Index
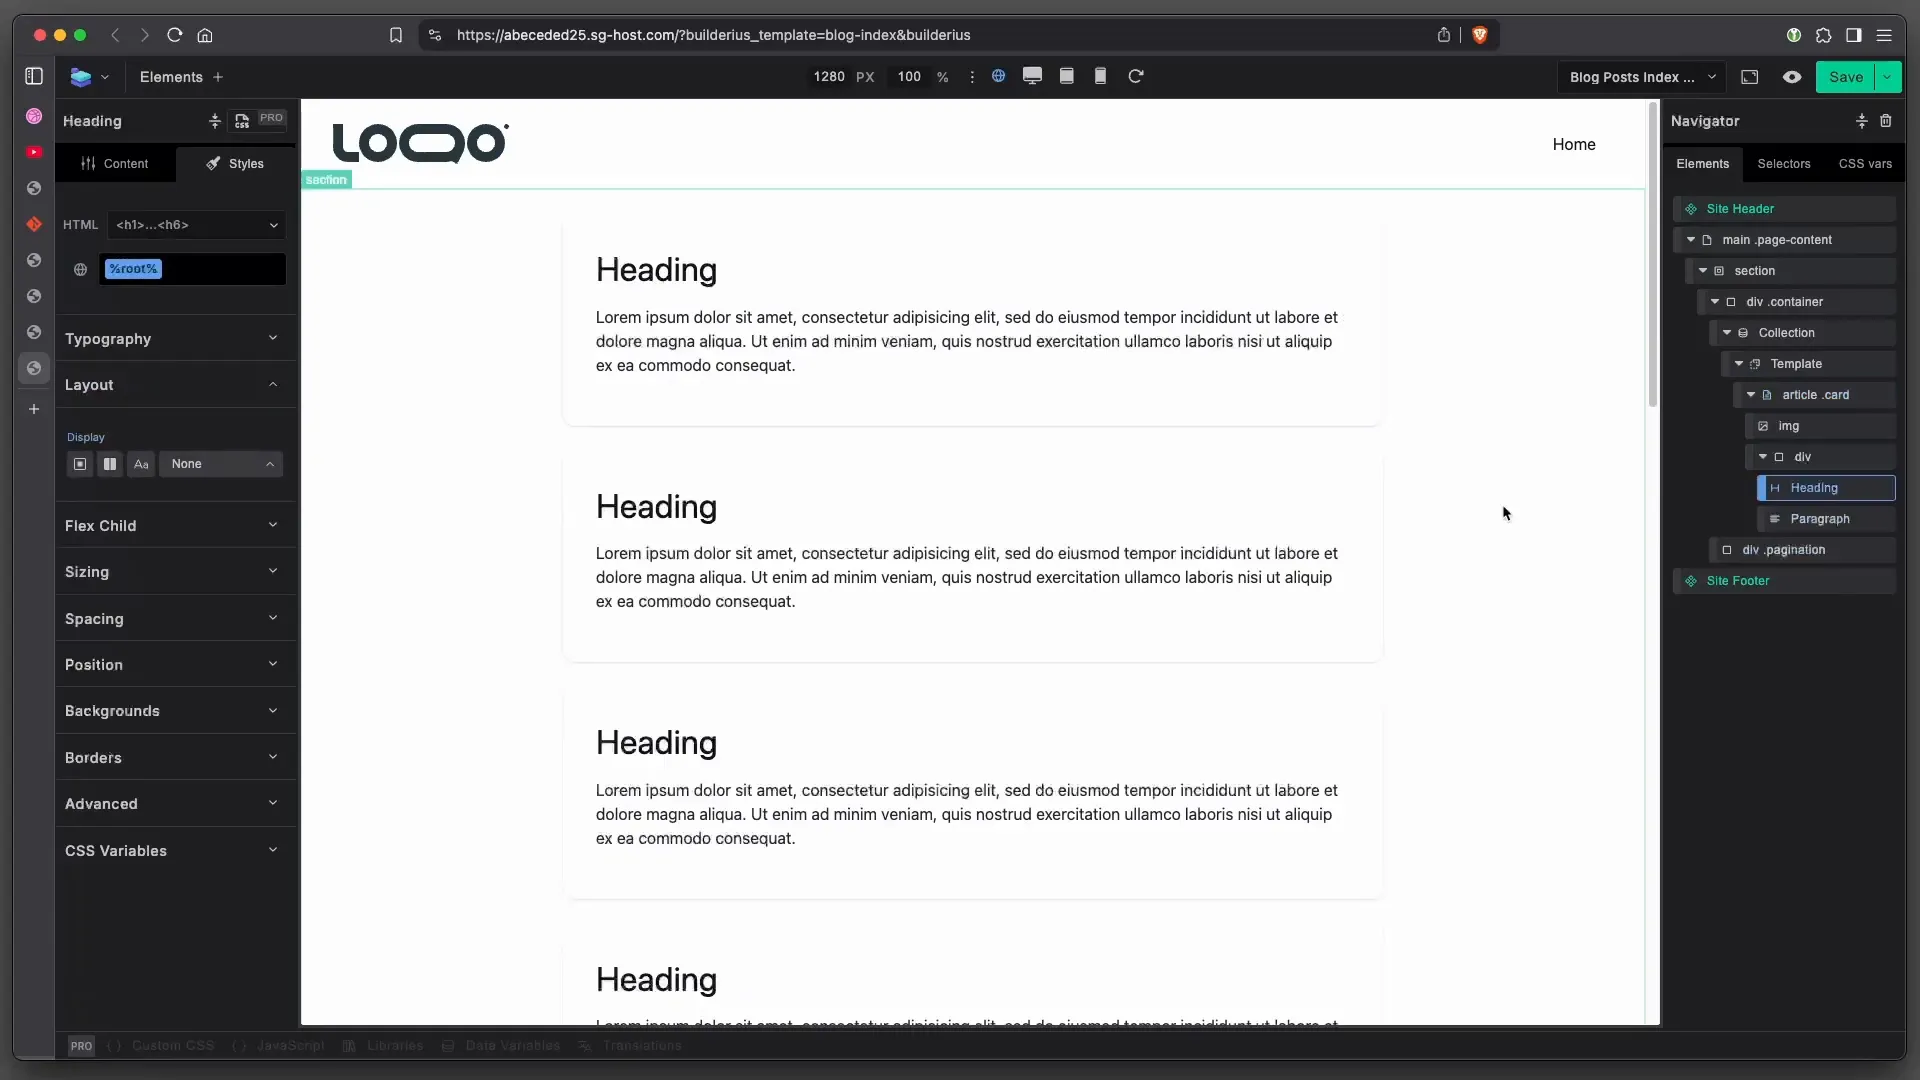
Begin by creating a new template for the blog index. This will serve as the main page where all your blog posts will be aggregated. Start by adding a collection to pull in your post data.
Inside the collection, add an article element, which will house individual post elements like the heading, paragraph, and featured image. This setup allows for a clean and organized display of your posts.
Don’t forget to add pagination at the bottom of the index to help users navigate through multiple pages of posts.
Creating a Release for the Blog Index
Once your blog index template is ready, create a new release for this feature. Label it as version 1.1.0, and describe it as the implementation of the blog index. This release will help you track progress as you continue developing your site.
Make sure this release is not published yet; you want to keep working in the development branch still.
Creating a Post Template
Each blog post needs its own template to ensure a consistent look and feel. Let’s create a post template that will serve as the foundation for all your individual posts.
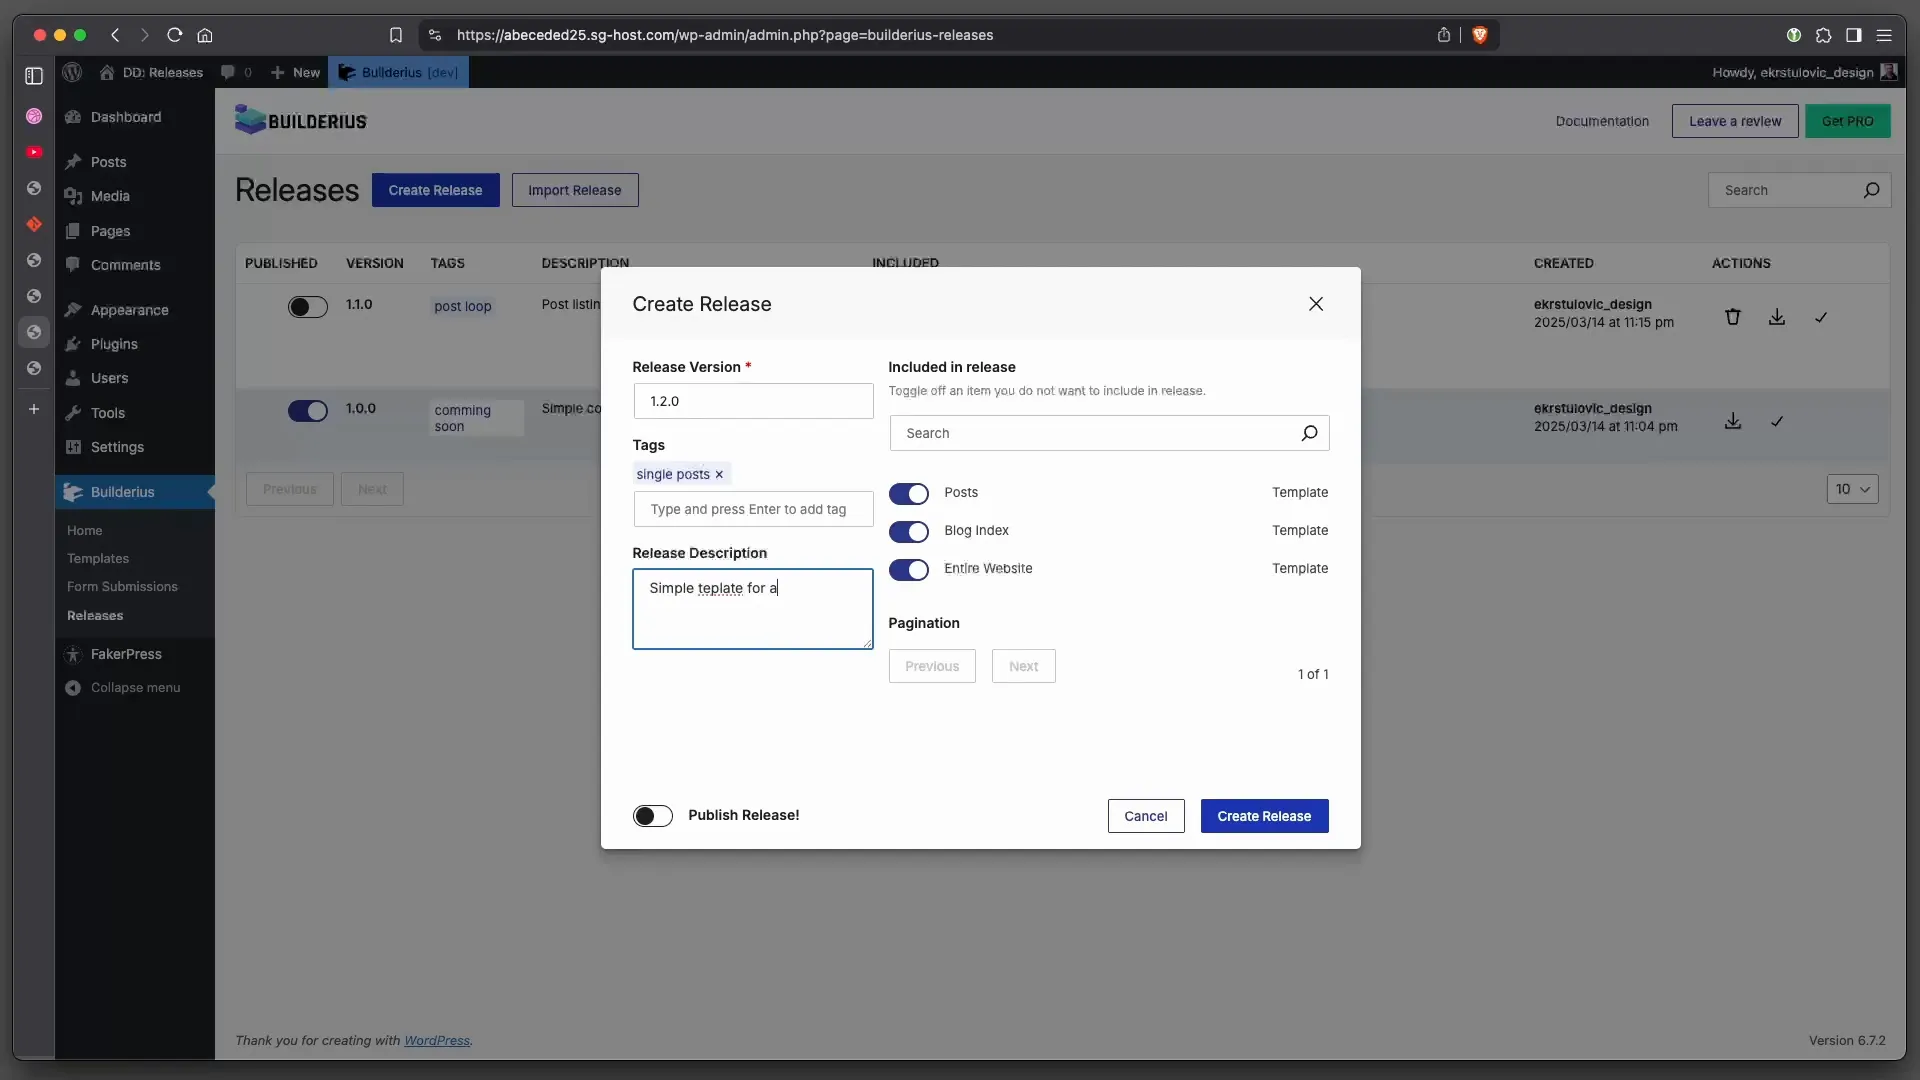
Designing the Post Template
In the template section, create a new template specifically for individual posts. Start with a section that includes a heading for the post title, a featured image, and a div for the main content.
After designing your post template, it’s time to create a release. Label this as version 1.2.0, and provide a description. Again, don’t publish this release just yet; keep it in the development branch to allow for further adjustments.
Managing Releases and Templates
Effective management of your releases and templates is crucial for a smooth development process. Let’s explore how to handle this efficiently in Builderius.
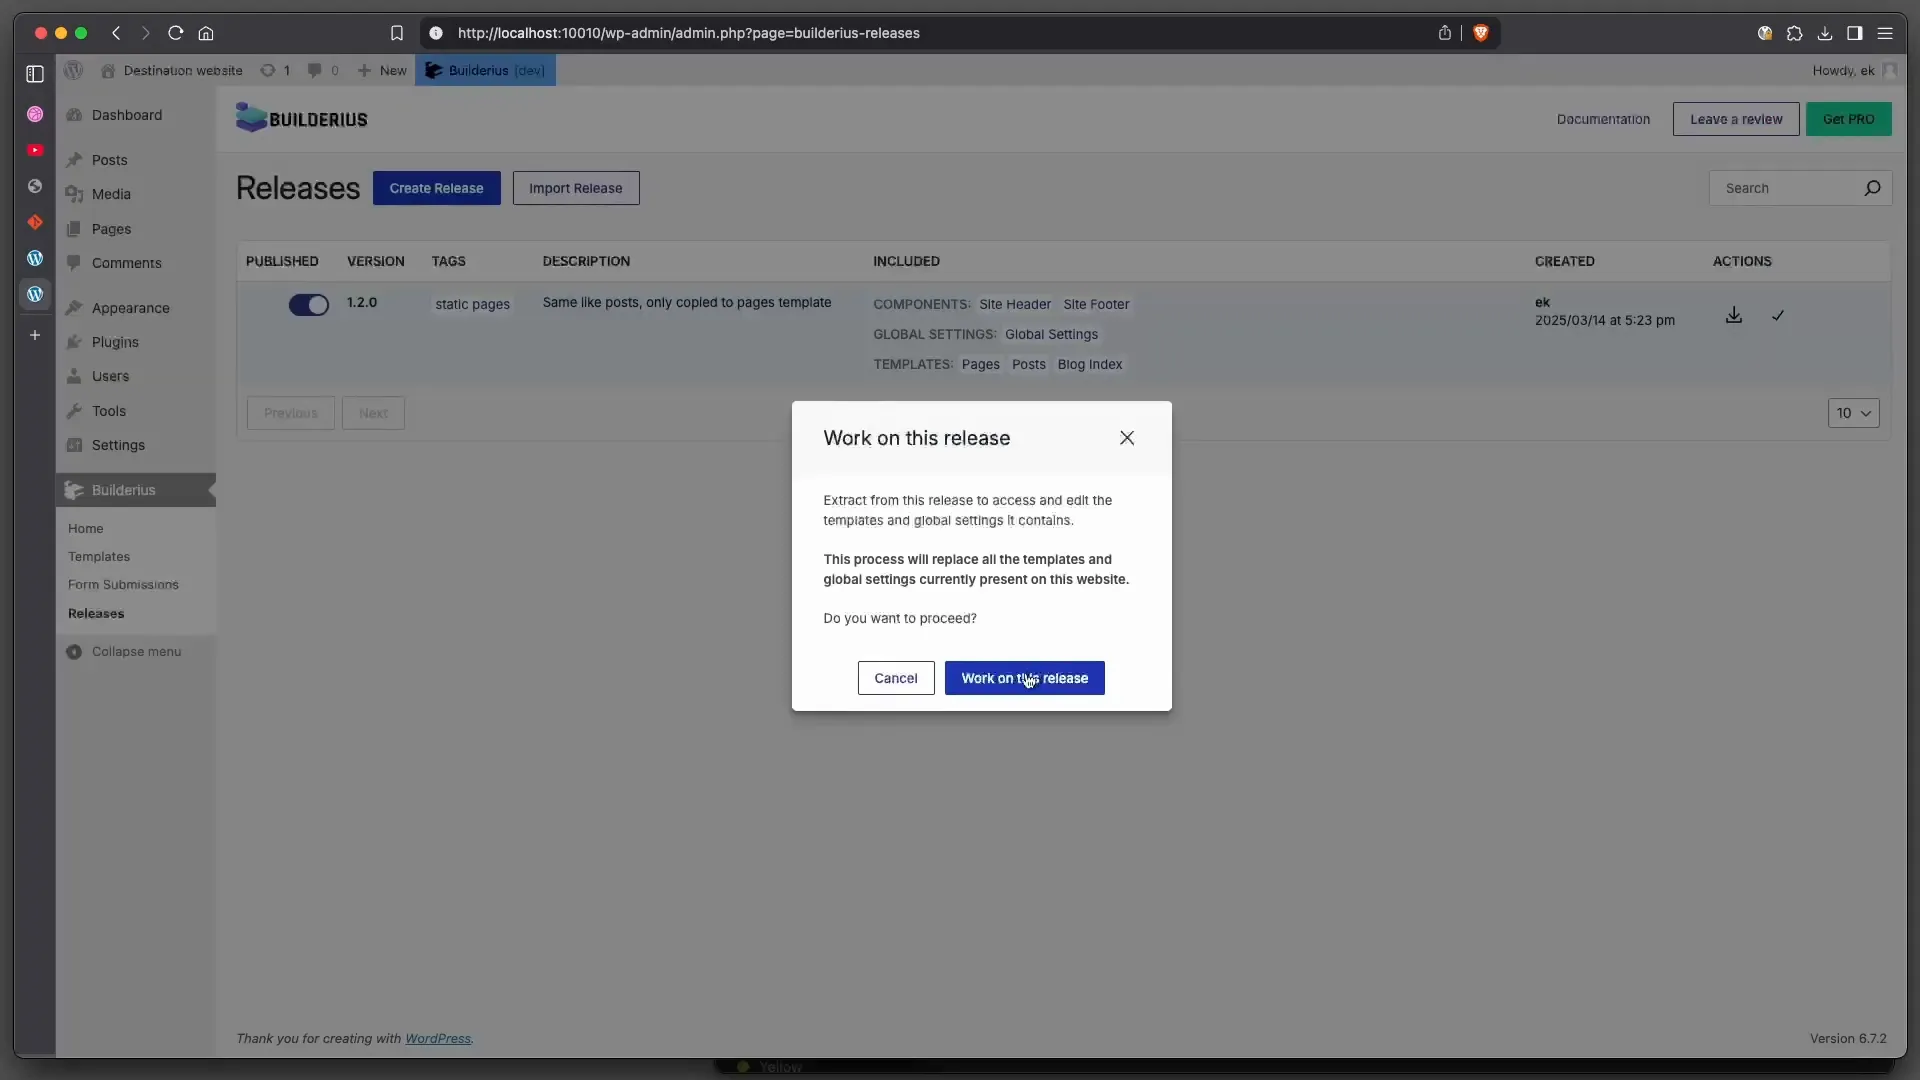
Reverting Changes and Extracting Templates
At times, you may find that a recent change didn’t work as expected. In Builderius, you can extract templates from previous releases to restore your work.
This is particularly useful if you need to revert to a stable version of your project. Simply navigate to the releases section and extract the templates you wish to restore.
Finalizing the Page Templates
Once you’ve made all necessary adjustments, finalize your page templates. Ensure each template is linked properly to the correct data sources and that they display as intended.
After finalizing, create a new release to capture these changes. This will help maintain a clear record of your project’s evolution.
Exporting and Importing Releases
One of the powerful features of Builderius is the ability to export and import releases across different sites. This is particularly useful for sharing templates and configurations.
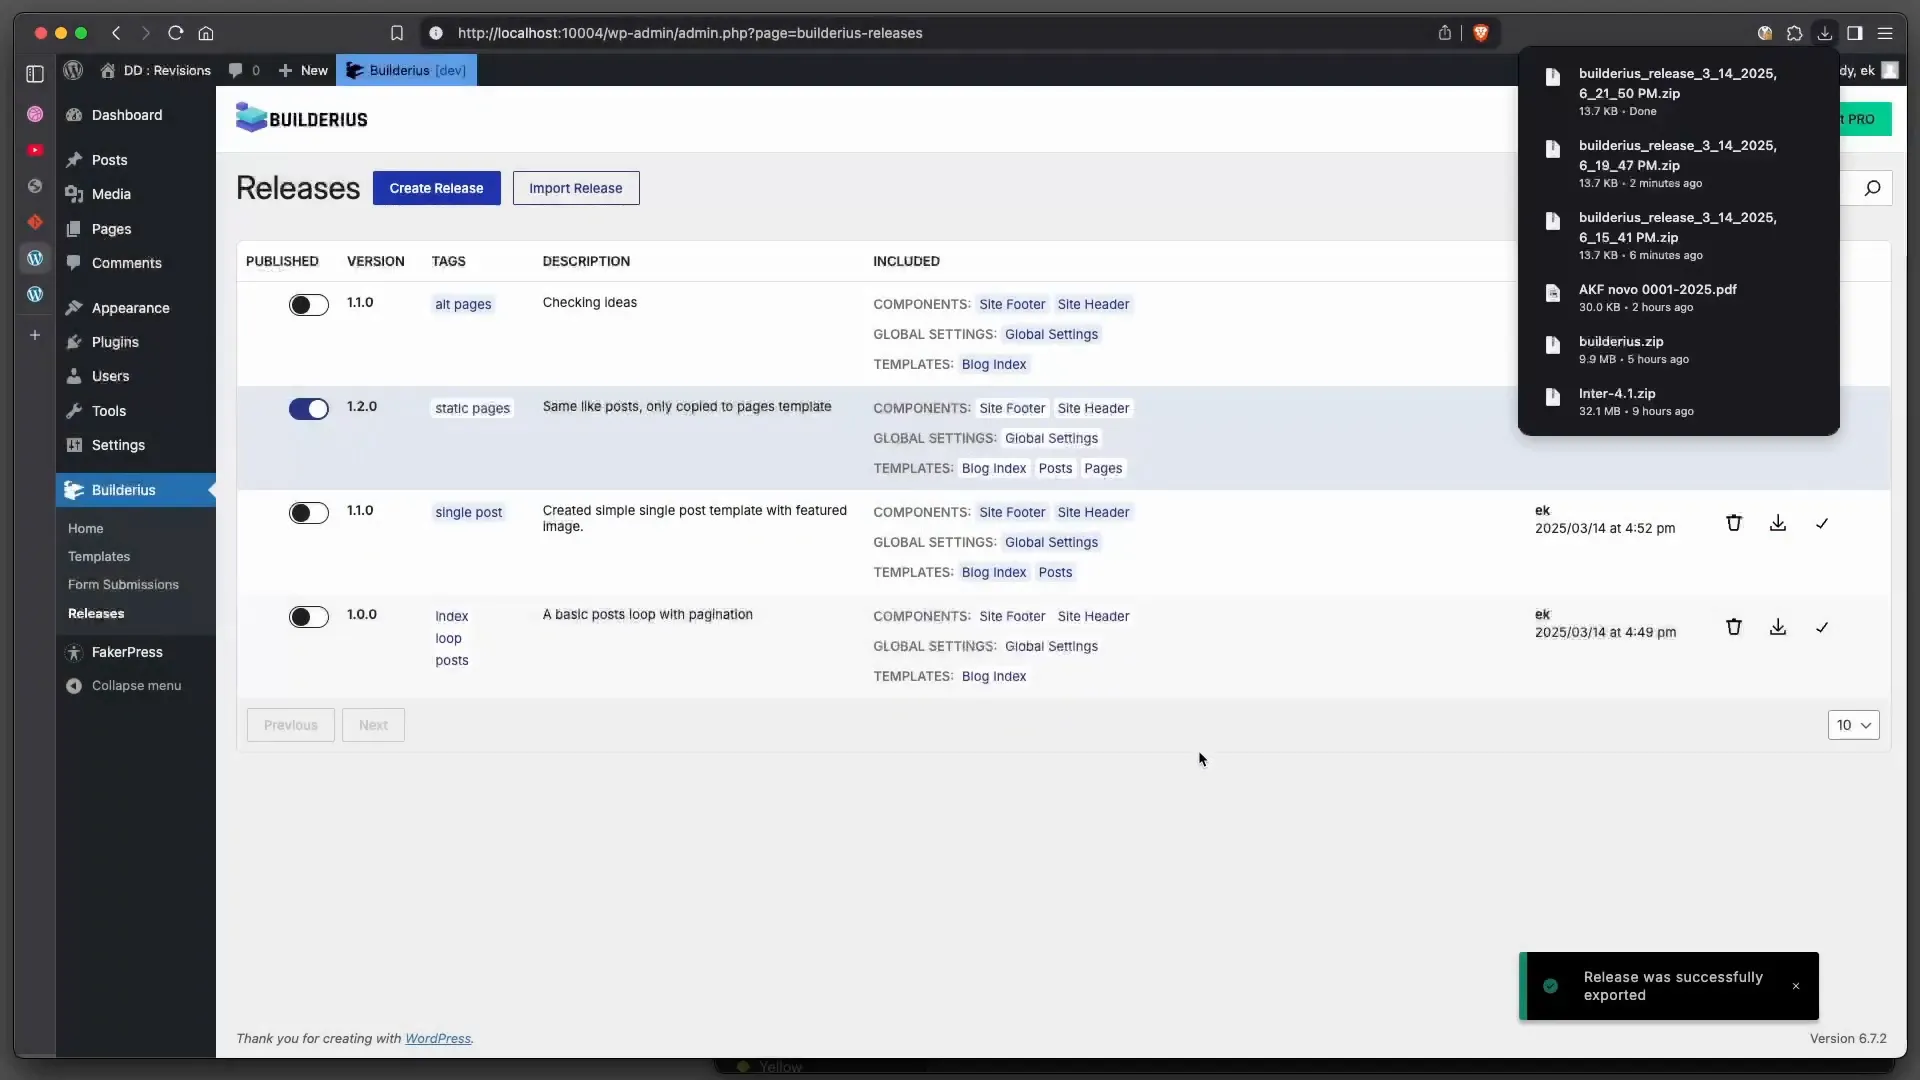
Exporting Your Release
To export a release, navigate to the releases section and select the option to export. This will allow you to save your current release to your local machine, ready for use on another site.
Importing into a New Site
On your new site, you can import the previously exported release. This process will bring over all the templates and configurations associated with that release.
After importing, remember to extract the templates to activate them in the development branch. This ensures that you can continue working on your new site without losing any functionality.

Understanding Dynamic vs. Static Data
When exporting and importing, it’s essential to understand the difference between dynamic and static data. Dynamic data references data fields in your database, while static data is fully embedded in the release.
When moving to another site, dynamic data will adjust to the new site’s content, while static data will be transferred as-is. This distinction is crucial for maintaining the integrity of your content across different environments.

Exporting and Importing Releases
One of the powerful features of Builderius is the ability to export and import releases across different sites. This functionality is particularly useful when you want to share templates and configurations seamlessly.
Exporting Your Release
To export a release, navigate to the releases section and select the option to export. This allows you to save your current release to your local machine, preparing it for use on another site.
Importing into a New Site
On your new site, you can import the previously exported release effortlessly. This process will transfer all the templates and configurations associated with that release.
After importing, remember to extract the templates to activate them in the development branch. This step ensures that you can continue working on your new site without losing any functionality.
Understanding Dynamic vs. Static Data
When exporting and importing, it’s essential to understand the difference between dynamic and static data. Dynamic data references data fields in your database, while static data is fully embedded in the release.
When moving to another site, dynamic data will adjust to the new site’s content, while static data will be transferred as-is. This distinction is crucial for maintaining the integrity of your content across different environments.
Future Enhancements and Pro Version Features
Looking ahead, we have exciting plans for future enhancements, especially in the Pro version of Builderius. We aim to extend the export and import functionality to include various parts of data, depending on your needs.
Integrations with plugins such as ACF will be a priority, allowing for a release that functions seamlessly even when dependent on other plugins. Our goal is to provide a comprehensive and robust solution that meets all your version control needs.
Planned Features
- Advanced Data Handling: Improved handling of dynamic and static data during exports and imports.
- Plugin Integrations: Enhanced compatibility with popular plugins to streamline the development process.
- User Interface Improvements: Further refinements to the user interface for an even more intuitive experience.
Conclusion
Mastering version control with Builderius empowers you to take full control of your development workflow. From tracking changes to managing releases, the built-in version control system is designed to enhance your productivity.
As you continue to explore Builderius, remember that effective version control not only protects your work but also fosters collaboration and innovation. Embrace these tools to streamline your projects and achieve your development goals.
FAQ
What is the difference between dynamic and static data?
Dynamic data refers to data that changes based on user input or other variables, often linked to your database. Static data remains constant and is fully embedded in your release.
Can I revert to a previous release?
Yes, Builderius allows you to delete a release and extract templates from previous releases to restore your work. This is particularly useful if a recent change did not go as planned.
How do I manage my releases effectively?
To manage your releases effectively, create detailed descriptions for each release, track changes consistently, and utilize the export/import features to maintain a clear workflow across different projects.
Will there be additional features in the Pro version?
Absolutely! The Pro version will include enhanced functionalities such as better integration with other plugins, advanced data handling, and improved user interface features.

Ready to build like a professional?
Transform your WordPress workflow with professional-grade visual development. No more compromising between speed and quality.