Old version: How to add a marketing popup with MailChimp subscription form
Article
What is an exit intent popup?
✨ Archive Notice: This post was written for a deprecated version of Builderius and may contain outdated information, screenshots, or workflows that no longer reflect the current software. We maintain this content for historical reference only. For current features and tutorials, please refer to our latest blog posts or official documentation.
An exit-intent marketing popup is a type of website popup or overlay that is triggered when a visitor to a website shows signs of exiting or leaving the site. These popups are designed to capture the visitor’s attention and encourage them to take a specific action before they leave the website, such as signing up for a newsletter, making a purchase, or providing their contact information.
The key feature of exit-intent popups is their ability to detect when a user is about to navigate away from the website, typically by tracking mouse movements and the position of the cursor. When the system detects that the user is likely to leave the page (for example, by moving the cursor towards the browser’s close button or the back button), the exit-intent popup is triggered, and it appears on the screen.
Exit-intent popups are often used in online marketing for various purposes, including:
- Lead Generation: Encouraging visitors to subscribe to a newsletter or mailing list.
- Cart Abandonment: Offering discounts or incentives to visitors who have added items to their shopping cart but are about to abandon the purchase.
- Promotion: Displaying special offers, discounts, or promotions to entice visitors to stay or make a purchase.
- Feedback and Surveys: Requesting feedback or conducting surveys to understand why visitors are leaving the site without taking the desired action.
- Redirecting to Relevant Content: Suggesting related content or pages to keep users engaged on the site.
Exit-intent popups can be effective in reducing bounce rates, increasing conversions, and improving overall user engagement when used strategically and thoughtfully. However, it’s essential to strike a balance and ensure that the popups do not become intrusive or annoying to visitors, as this can have a negative impact on the user experience.
Step by step adding the popup to the site
This how it will look like after we complete the popup:

Adding Builderius and Builderius PRO plugins
We are going to use Modal module from Builderius plugin. This module is available in the pro version only.
Creating a hook template with the modal
We are going to add the popup to an existing site which is not built in Builderius. Such site can be use a classic theme or it can be built with some other visual builder. It is not very important. The important thing is that we still can use Builderius, create a “hook” template and add our popup to this template, then show it everywhere on the site. These are the properties of the hook-template we would have to add:

Important part is “hook” property. In this case we are using a completely custom hook added to the theme just before the closing “body” tag. Your theme might not have this hook, however you can use a different suitable one.
This is the modules structure of the template we have to create:
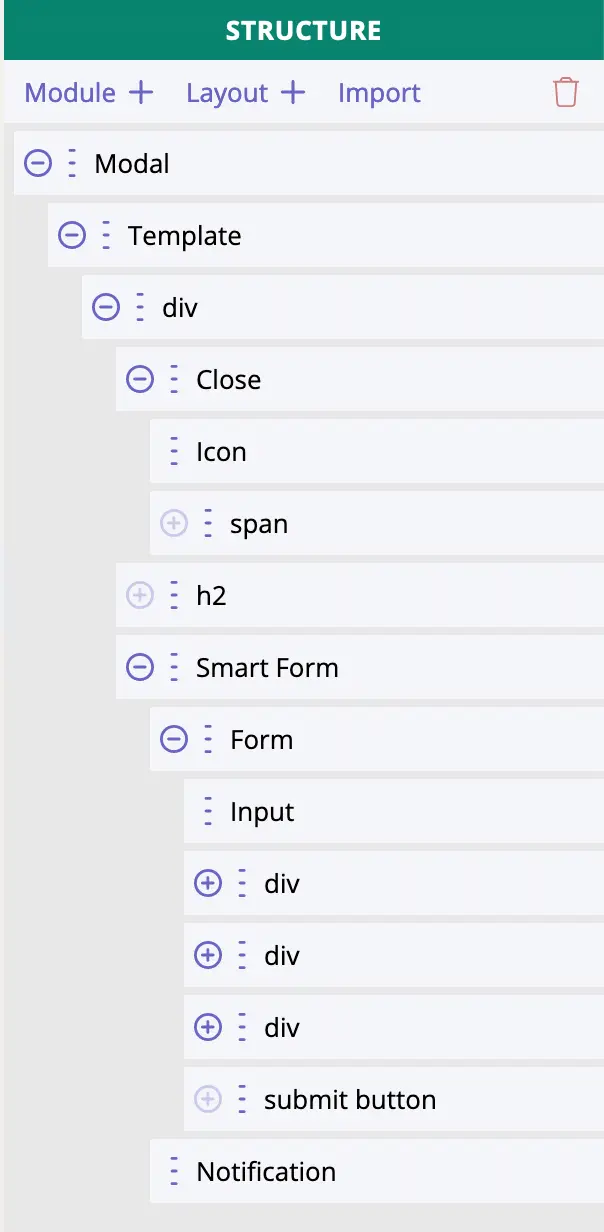
It is just an example. There might be more modules added with some content, if needed.
In the template of the example we also have a data variable type “GraphQL” with this value:
query {
    curLang: php_function_output(function: "pll_current_language")
}
This piece of code gets current language since the site from the example is a multilingual one. If your site is not multilingual – you can skip adding this data variable and also remove a hidden input with the language value from the form.
We also include CookieJS library to the template. hosting it locally or downloading from CDN (example: https://cdn.jsdelivr.net/npm/[email protected]/dist/js.cookie.min.js) – it works either way:

Finally, we should add a custom JS code that will be storing a cookie after the popup is shown first time and checking if the cookie exists so not to show the popup every page visit/reload:
document.addEventListener('readystatechange', () => {
    if (document.readyState === 'complete') {
        const COOKIE_NAME = 'exitintent_done';

        document.addEventListener('mouseout', function (e) {
            if (0 > e.clientY && null === e.relatedTarget) {
                const modal = document.querySelector('.mcModal');

                const cookie = Cookies.get(COOKIE_NAME);

                if (!cookie) {
                    Cookies.set(COOKIE_NAME, true, { expires: 30, sameSite: 'strict' });

                    if (modal) {
                        modal.open();
                    }
                }
            }
        });
    }
});
To make your life easier, this is the exact template created in Builderius. You should import it Revisions inside the builder mode: link to template config export archive.
Adding back end functionality for MailChimp subscriptions
We are going to use a ready-made library – a wrapper for MailChimp API – to make our lives easier. MailChimp API can be confusing, so the wrapper we are going to use makes it much more user friendly for us.
So, the first things to do is to include this php code/file into our theme: https://github.com/drewm/mailchimp-api/blob/master/src/MailChimp.php In my example, I actually has modified the child theme. You can do the same or use one of the snippet manager plugins existing on the market. There are also free ones.
The second thing to do is to create our own REST API endpoint and add our specific logic for subscriptions. I have the exact code, you would just provide your MailChimp list ID and API key:
<?php

// add REST api endoint
add_action( 'rest_api_init', 'fdm_register_route' );

function fdm_register_route() {
    register_rest_route('forms/v1', '/mc-subscribe', array(
        'methods'             => 'POST',
        'callback'            => 'fdm_mc_subscribe_simple',
        'permission_callback' => '__return_true'
    ));
}

// callback function for our endpoint
function fdm_mc_subscribe_simple($request) {
    $parameters  = $request->get_json_params();
    $email       = sanitize_email($parameters['email']);

    // this is ACF custom field, you do not have it
    // you may add list ID and API key directly into this code instead
    $mc_settings = get_field('mailchimp_settings', 'options');

    $mc_api_key  = $mc_settings['api_key'];
    $mc_list_id  = $mc_settings['list_id'];
	$lang = sanitize_text_field($parameters['lang']);

	unset($parameters['email']);
	unset($parameters['lang']);
	unset($parameters['_sfName']);

    if ( !empty($email) && !empty($mc_api_key) && !empty($mc_list_id) ) {

        $MailChimp = new DrewM\MailChimp\MailChimp($mc_api_key);
        $args      = [
            'email_address' => $email,
            'status'        => 'pending',
	    'language' 	    => $lang
        ];

        if ( !empty($parameters) ) {
            foreach ( $parameters as $p_name => $p_value ) {
                $args['merge_fields'][$p_name] = $p_value;
            }
        }

        $result = $MailChimp->post("lists/$mc_list_id/members", $args);

        if ( isset($result['status']) && ('pending' === $result['status'] || 'subscribed' === $result['status']) ) {
            $res = ['success' => true, 'message' => __('Thanks! Please, check your inbox for the confirmation email.', 'fdm')];
        } else if ( isset($result['status']) && isset($result['detail']) ) {
            $res = ['success' => true, 'message' => $result['detail']];
        } else {
            $res = ['success' => true, 'data' => $result];
        }

		return $res;
    } else {
        return ['success' => false, 'message' => __('Something went wrong.', 'fdm')];
    }
}
Summary
The form in the hook template has action URL pointing to our custom endpoint. So the data form the form – first name, last name, email, language – is being send to the callback function mentioned in this article. In this function we make a call to MC API and subscribe a visitor. Thanks to the hook template from Builderius this popup can be shown on all pages and it contains a JS code that adds a logic of displaying the popup based on existence of a cookie in the browser.

Ready to build like a professional?
Transform your WordPress workflow with professional-grade visual development. No more compromising between speed and quality.